


DIVA’s Main Screen | Adding/Editing Goals | Setting Preferences | Goal & Affirmation Playback | Utilities | Goal & Affirmation Display
Adding & Editing Affirmations:
It’s up to you to populate DIVA with your Goals and Affirmations. The two are fairly similar, but there are differences. Unlike Goals, Affirmations have no photographs. Affirmations have no pictures because they are basically reminders of things you must do, not things you want to acquire or attain.
![]() When you click on the AFFIRMATIONS button on the main screen, you land at the list of your existing Affirmations. When you have a blank Affirmation file, the list screen will be empty and you’ll be asked if you want to add a new one. If you say no, you’ll be returned to the Main screen. If you choose to add a new Affirmation, you’ll be presented with the following screen:
When you click on the AFFIRMATIONS button on the main screen, you land at the list of your existing Affirmations. When you have a blank Affirmation file, the list screen will be empty and you’ll be asked if you want to add a new one. If you say no, you’ll be returned to the Main screen. If you choose to add a new Affirmation, you’ll be presented with the following screen:
This is a blank Affirmation screen. There is only one section here… the text section of your 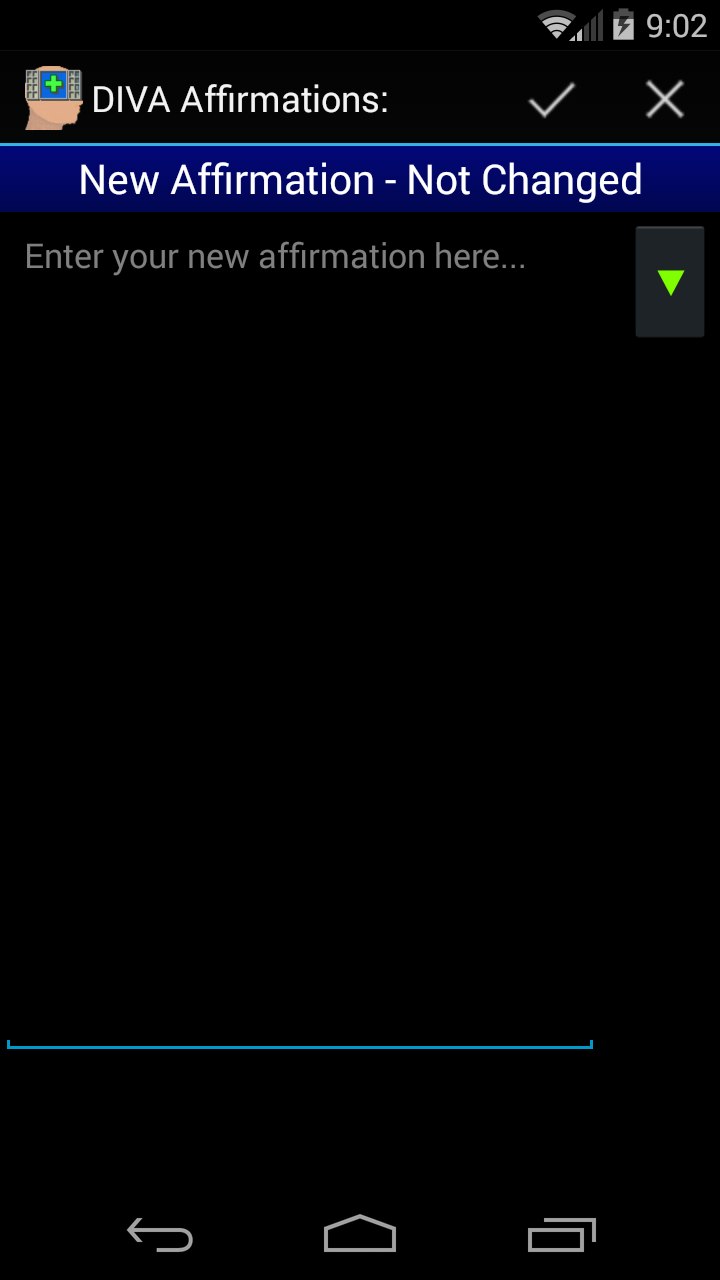 Affirmation.
At the top is the command bar, where you save or cancel your changes, and delete an affirmation..
You MUST enter some text. When the Affirmation is shown in the slideshow, it’ll be shown on a screen with the back color and text color you selected in Settings.
The text of the Affirmation is regular text entry, as in other apps. Your Affirmation can contain any characters etc., including returns and line feeds. They will be displayed in the lists with the carriage returns and line feeds included.
 You can also see in the screenshot that there’s a button with a green, down arrow. Touch it and this button
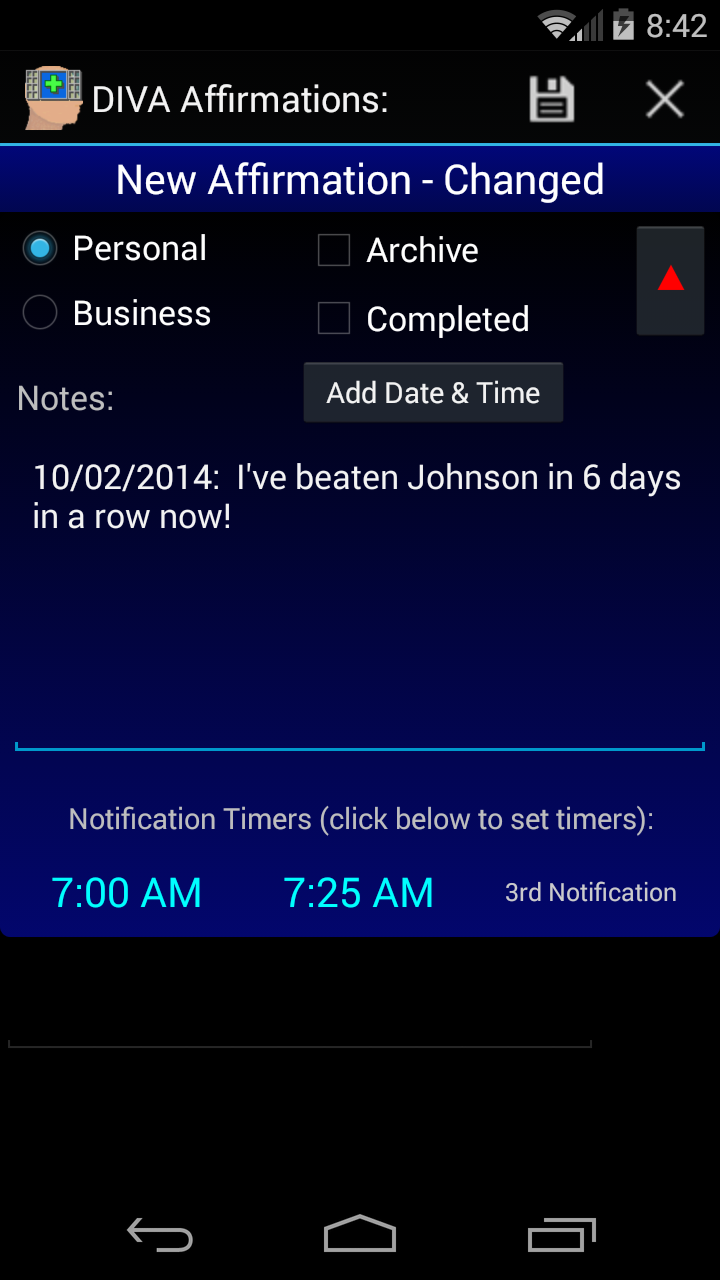
 ![]() brings up the Options Panel. Here, set the options that apply to this particular Affirmation. You can choose if this is a Personal or Business Affirmation, whether or not it’s archived or completed, add up to three notifications to each Affirmation and save notes on your progress with the Affirmation. Notice that the green button on the right changes to a red button, which will close the options panel.
brings up the Options Panel. Here, set the options that apply to this particular Affirmation. You can choose if this is a Personal or Business Affirmation, whether or not it’s archived or completed, add up to three notifications to each Affirmation and save notes on your progress with the Affirmation. Notice that the green button on the right changes to a red button, which will close the options panel.
If you ![]() click on the Add Date & Time button, it will add the date and time at the end of the existing notes, so you can create a new notation about the Affirmation, the progress of the Affirmation, and any other notes that may apply. These notes can be very long and complex.
click on the Add Date & Time button, it will add the date and time at the end of the existing notes, so you can create a new notation about the Affirmation, the progress of the Affirmation, and any other notes that may apply. These notes can be very long and complex.
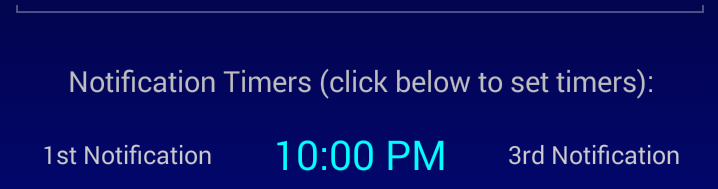 At the bottom of the Options Panel are three notification timers. If y
 ou touch on any of those, you’ll get the Time Picker Wheels shown on the left… Choose the time you want for your Affirmation Notification, as well as AM/PM, and click OK. The time you selected will be displayed in place of the Notification marker that you touched. If you want to blank out and remove a notification, set ANY wheel to “–” (double dashes) and when you click OK, you’ll be asked if that’s what you want to do.
Saving Your Affirmation:
Once you’re satisfied with your Affirmation, click on the Save button and you’ll be returned to the Affirmations List. From this list, you can access existing Affirmations… when you click on one, it’ll open up the same screen you saw when adding a new Affirmation.
The Affirmations List – How to Edit an Affirmation:
 The Affirmations list shows every time you click the AFFIRMATIONS button on the main screen. To edit an
 existing affirmation, click on it in the list. The Adding/Editing screen discussed above will show so you can modify your Affirmation. When you’re done modifying, click the Save button on top, or Cancel if you want to discard your changes. If you have made no changes, there will be a Close button instead of the Cancel button.
On the right hand side of each listed Affirmation, you’ll see a green and red arrow. Use ![]() these arrows to reorder your list items and the sequence in which the Affirmations are read to you. The green button is up, and the red button is down. When the buttons are gray, they’re disabled as that specific item can’t go in the disabled direction.
these arrows to reorder your list items and the sequence in which the Affirmations are read to you. The green button is up, and the red button is down. When the buttons are gray, they’re disabled as that specific item can’t go in the disabled direction.
You’ll also notice that the list adjusts itself to display your entire Affirmation, even carriage returns if they’re included in your Affirmation.
To save your changes throughout the Affirmations session, click on the Ok button. You can also Cancel your changes by choosing the Cancel button.
Deleting an Existing Affirmation:
 When you’re Adding, Editing or Deleting an Affirmation, you use the icons on the app’s action bar to finalize the action you want to complete. When you’ve created a new Affirmation, only two of the action bar icons will be visible… the Save (disk) and the Cancel (X) icons. You cannot delete a new Affirmation because it hasn’t been saved yet. When you edit an existing Affirmation, all three icons will be visible… the middle one is the Delete (trash can) icon. To delete an existing Affirmation, click on the Delete icon on the Action Bar. If you have Disable Simple Messages unchecked in General Preferences, you will have to confirm the deletion, otherwise, you’ll just be returned to the Affirmations List with the item deleted.