


We’ve listed AI2 tips below in order of what we feel is their relative importance. They may be slightly out of order, depending upon your perspective!
Shrinking AIA File Size | Redundancy | The Emulator Stinks! | Procedures | Multiple Screens | Debug with DoIt | Why Is My App Slow? | Taking Screenshots | Making an AIA File
-
BACK UP YOUR WORK WITH AN AIA FILE!!! – THIS DEFINITELY BELONGS AT THE TOP POSITION:
App Inventor is a cloud-based Android development environment. MIT has provided a simple way to back up your work, which you should do on a REGULAR basis. To backup your project, you export it to an AIA file that gets stored on your computer. Now, you may think it isn’t important, or that you’re too busy, or “in the zone,” but you’ll feel very differently if you lose your project. While MIT maintains backups, there’s no guarantee that your project is protected. The instructions on how to do this are below towards the bottom of the page. But you feel pretty confident that you don’t have to do them, right?
Here are several reasons why you may lose your work without making a backup AIA file:
- Because it’s cloud based, you’re depending upon a LOT of stuff to go right to keep your project secure. Here is what can go wrong:
- Your internet connection could fail, just as you or the system is saving your project…
- The MIT server could go down…
- Your internet connection could fail because you forgot to pay the cable bill…
- You could lose your connection if one of the many routers between your machine and the server fails…
- Your computer could get fried by some electrical surge you’re not protected against (if you’re not doing back-ups, you are probably not using a surge suppressor strip either)…
- Your own router could fail…
- Your own modem could fail…
- Your provider could switch systems right in the middle of your save…
- Windows itself could fail (BSOD or shutdown)…
- Your power could go out…
- Your cat or dog, or the resident mouse, could gnaw through the Cat 5 (no pun intended) cable lying under your desk that connects your router to the computer!
- Your own wireless connection could get weak and fail…
- Your browser could have a memory issue, cough up and die… you’re out of luck…
- Lightening could strike one of the many points between you and the server…
- The Cat 5 plug could be pulled out of the back of your machine, probably by the cat (see “K”)…
- The dog or cat in “K” could knock the modem over disconnecting everything…
- For some unknown reason, you lose some of your blocks
- The MIT server could get overloaded with lots of other people trying to build projects they too haven’t saved to AIA files!
- Your own hard drive could fail (remember that warning you’ve been ignoring when the machine boots?)…
- The planets could be completely out of alignment!
- You could have an ERROR in your program that triggers something else on the build server to fail…
- Your soda/tea/coffee could spill into your keyboard and the computer freezes…
- One of your classmates could think it’s funny to mess with your exam project…
- The janitor working down the hall could blow the main circuit breaker with his floor waxer…
- The dog could eat your homework…
- You could just hit the wrong key and poof…
- You’ve made changes to your project, and they’re not working. You have no AIA file… Now what?
- For some unknown reason, even though there are protections built into App Inventor, you lose your blocks on the screen where you’ve spent the last 10 hours working like a madman/madwoman!
- You deleted the project, by mistake, and now it’s gone forever…
- Because it’s cloud based, you’re depending upon a LOT of stuff to go right to keep your project secure. Here is what can go wrong:
Well, if you have an AIA file, or even better, several of them, you could save your own butt. The other option is to ask an MIT Forum moderator if someone can get the project back for you, and that may or may not be possible.
Say you’ve made a lot of changes, and they’re not working. If you have a recent AIA file, simply import it back into the UI, and start working again. Without that AIA file, you’ll have to systematically undo everything you did during the session, if you can remember what that was.
Make AIA files, OFTEN. They’re small, unless your project is huge or contains tons of assets, and you can always delete them if you don’t need them. But, when you need them, you’ll be very, very, very happy you have one. Instructions on how to make an AIA file are here.
You can ALSO make checkpoints, but those are less reliable in that they are also stored on the server, not on your local machine.
Backup Your Work | Redundancy | The Emulator Stinks! | Procedures | Multiple Screens | Debug with DoIt | Why Is My App Slow? | Taking Screenshots | Making an AIA File
-
MY PROJECT AIA IS OVER 5MB – IT WON’T LET ME COMPILE/BUILD – WHAT DO I DO?
App Inventor has a 5MB limit on how big your AIA file can be (for more information on how to create an AIA file, click here). This has to do with how the build server handles projects, and while you may be able to get by with a file that’s bigger, the likelihood is that your project won’t compile every time. Reducing the size of an AIA file really isn’t that difficult. Of course, the answer to the main question here is that you have to reduce the size of that AIA… But how?
Most likely, your AIA file is bloated because you’ve loaded assets into the project that are either too voluminous (too many), or too big (size-wise) or simply unneeded. Let’s discuss those below:
First, what are assets? They’re pictures, sounds, videos, graphics etc. that you’ve added to your project.
Too Voluminous – If you have uploaded many, many assets to your project, you’ll have to remove some of them, or use the other techniques mentioned below. Do you really need all of those assets? Try to reuse items if you can.
Too Big – This is a pretty simple item… you have a 5MB limit, and App Inventor takes at least 1.5 of those megabytes just to work. If you add a 7MB video, your project will fail. But, you say, “I need that video!” The best way to handle this is to load the video from the web the first time the app runs. Taifun and Hossein have solutions on the App Inventor forum on how to do this. Rather than include the video with the APK, download it when the app first runs.
It’s important to remember that you’re dealing with small devices… phones and tablets have small screens. You don’t need a 12MB photo to fill the screen. In fact, most of the photos a device takes these days are much bigger than they can display on the device, so the device re-sizes the graphic to fit. Similarly, you should do the same. Using any good graphics program (Gimp, which is free, Photoshop etc.), resize the photo to a smaller size that will fit the worst case device which you’re targeting (right now, the largest tablet is 10.5″).
You’d be surprised how much a photo’s disk size will decrease when you reduce its physical size. Use your head, and shrink those photos. If you can’t do that, then download them the way it was described before.
Unneeded Assets – Sounds strange, doesn’t it? Not really… if you add assets to your project, make SURE you actually USE them! One user complained he couldn’t compile his app because it was several megabytes above the 5MB limit. In his project, he had a PDF file that was 3MB in size. He used it only for reference. He used graphics from that PDF file, but had copied them and added them as separate assets. His app wouldn’t compile! After some investigation, it was found that he never actually used the file in his app… rather, he just looked at it from time to time for reference. Once he deleted that PDF file from the project, it compiled with no problems at all!
So, check your assets… If you don’t need them, get rid of them. If they’re too big, either resize them or download them after the app runs the first time!
Backup Your Work | Shrinking the AIA File | The Emulator Stinks! | Procedures | Multiple Screens | Debug with DoIt | Why Is My App Slow? | Taking Screenshots | Making an AIA File
-
REDUNDANCY:
Don’t Do That. Don’t Do That. Don’t Do That. Don’t Do That!
Did we have to tell you that 4 times? Did you get it the first time you read it? Of course. The same goes for programming, especially in App Inventor 2.
Many components are reusable. For instance, some people have posted issues where, in their Designer screen shots, we see 4 Notifiers at the bottom of their screens. That’s Redundant, That’s Redundant, That’s Redundant, That’s Redundant! You only need ONE notifier on a screen. In the case, for example, of the Notifier, to use it several times in a screen, with different responses to each, use a global variable to identify the instance calling the Notifier, and then handle that instance in the AfterChoosing block.
In the screenshot below, we’ve used a global variable to track which Notifier message was used, assign it in the button click, and then handle it in the AfterChoosing block. We’ve used only ONE notifier, but handle it differently for each message posted to the user, in this case, message 2 from the Settings button in our project or message 3 from the ShowModify button (in this particular project, the screen has three places where it uses notifiers… Settings.Click and ShowModify are just two of the three). We could have used 4 separate Notifiers, but that would have been REDUNDANT! The same goes for many other AI components. Try to reuse the components to avoid bloating your project and app.
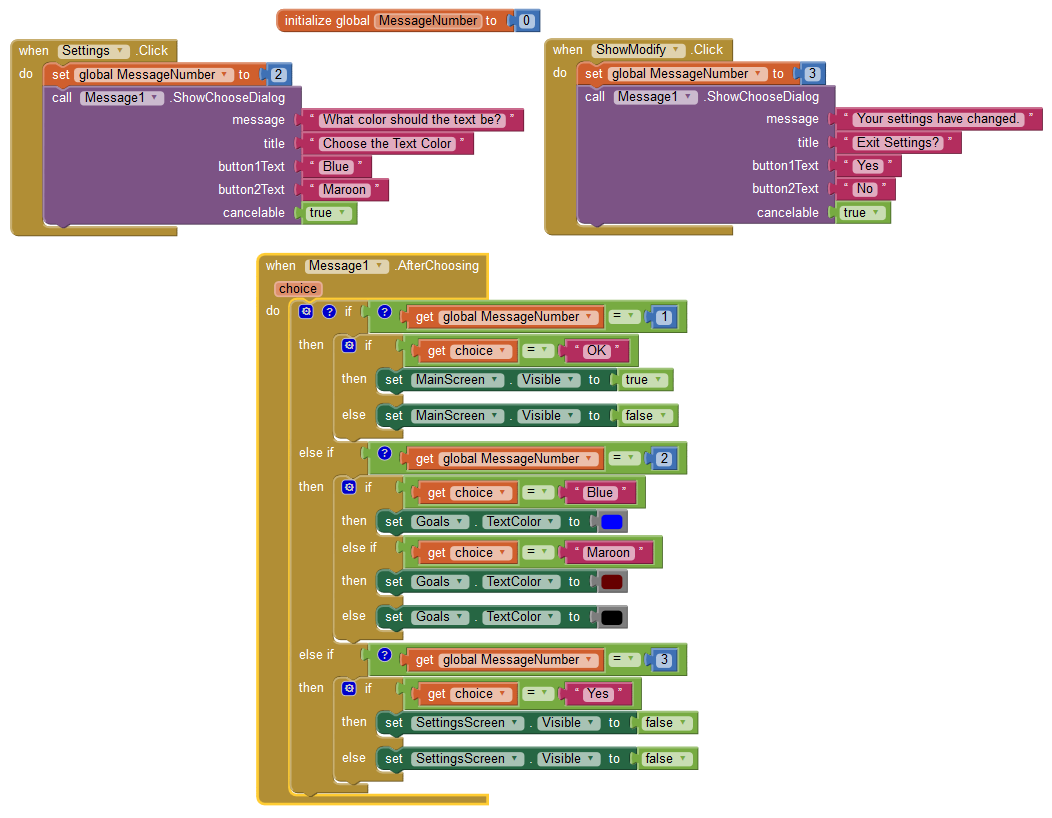
Using a Notifier’s (here Message1) AfterChoosing Block to Handle Multiple Requests to the Same Component – Much More Efficient
Backup Your Work | Shrinking the AIA File | Redundancy | Procedures | Multiple Screens | Debug with DoIt | Why Is My App Slow? | Taking Screenshots | Making an AIA File
-
THE EMULATOR’S SLOW & OOKEY! ARE THERE OPTIONS?
Yes, the stock emulator is slow! And very often it’s inaccurate. MIT didn’t create the emulator… it’s from Google. But, most of us agree, it’s lame. Can you speed it up? No, you can’t. Can you make it look better? No, you can’t. Can you set it for different screen resolutions? No, you can’t. So, what to do…
Well, there are other options. One of the best is to use the free Genymotion emulators. Not only are they accurate and current, they’re updated frequently and cover many different Android OS versions.
The stock emulator is running the lowest common denominator in terms of Android OS… and it doesn’t always render well… And… it’s S-L-O-W!!!
Try the Genymotion emulators. They’re free. You’ll have to set up VirtualBox from Oracle, but it’s part of the setup (make sure you download the full setup including VirtualBox), and fairly easy to do. Once that’s done and Genymotion is installed, you can install the many available virtual devices, including phones, tablets and even custom emulators that you can modify yourself. Plus, you can choose devices running various versions of the Android OS.
Are they better? Heck yeah ;)! You connect to them via the USB option in AI’s user interface, and they’re speedy. You have to have the appropriate emulator running first… then you just choose the USB option from AI’s Connect menu and you’re off and running.
Take a look below… a simple AI screen in Designer Mode, running on the stock emulator, and running on the Genymotion emulator emulating a Moto-X running KitKat 4,4,4, 720×1280 resolution. In addition, because the Geny emulator is already loaded and running, it only takes about 15 seconds to initialize your project when called from the Connect menu… In contrast, when the stock emulator is called from the Connect menu, it’s at least a minute before it all initializes and displays. Which would YOU prefer to work with?
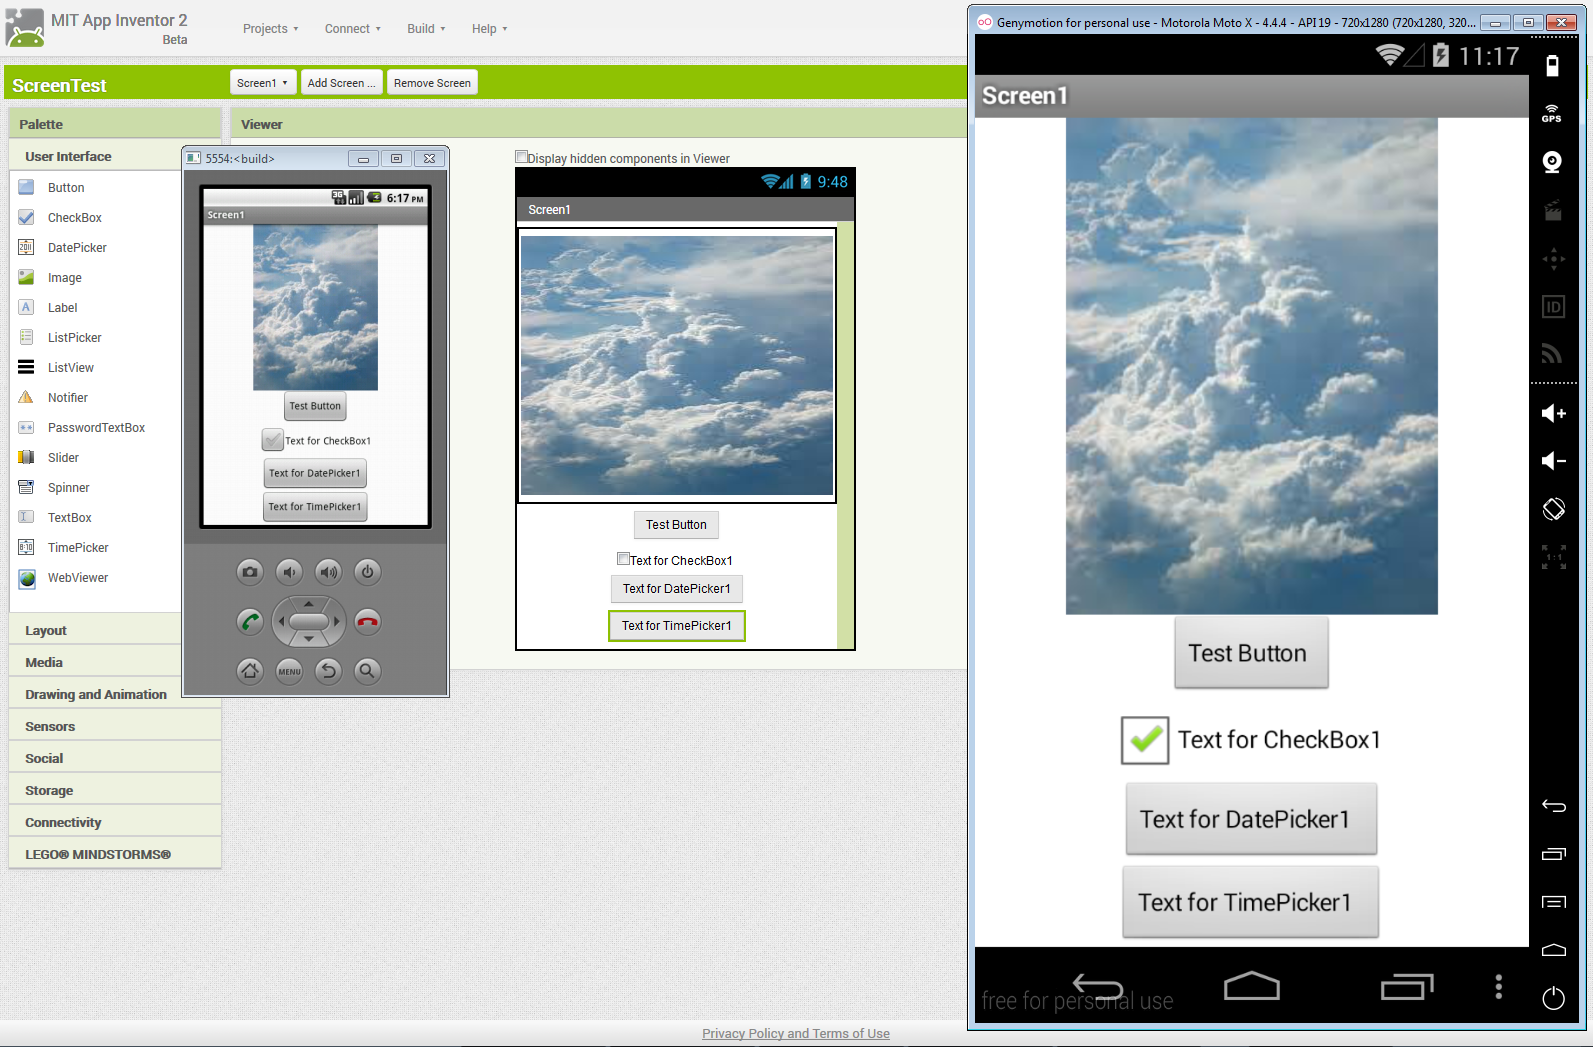
AI2’s Design Screen, with the Stock emulator Running on the Left, and the Genymotion Emulator running on the Right.
If you get a message that AI can’t “see” your USB device, it’s probably because AI’s setup is using an older version of the adb. To solve this issue, copy the adb.exe supplied with the Genymotion software and paste it over the one installed in the commands-for-Appinventor folder on your computer (you’ll overwrite the old one, so to feel more comfortable, you can rename the old one first, and then just paste the new file in). Genymotion software can be found at www.genymotion.com. Make sure you install the Free-For-Personal-Use version, unless you need more capabilities and usage.
Backup Your Work | Shrinking the AIA File | Redundancy | The Emulator Stinks! | Multiple Screens | Debug with DoIt | Why Is My App Slow? | Taking Screenshots | Making an AIA File
-
USE PROCEDURES, SAVE SPACE & AVOID REDUNDANCY:
App Inventor allows you to create Procedures. Use Procedures to do things that happen several times in each screen. Rather than duplicating blocks over and over, which is both redundant and resource consumptive, use a Procedure. You can also use a procedure to isolate a set of blocks that do something into a compact unit that you can edit and reference from all over your screen’s blocks.
Here’s an example. I want to change the settings of several components every time something changes. I could have a staggeringly lengthy set of blocks setting everything in every button, but that’s REDUNDANT! Instead, I can use a procedure to set them all in one stroke. In the example below, I’m setting the back color and text color of several labels. In the first screenshot, you see it with the plethora of blocks for each call. In the second, you can see how it was done by calling a procedure.
In the first shot, these are the blocks to set the back and text colors for 5 labels, using just two buttons… The second screenshot shows how it’s done using a procedure and two global variables, for not two but FOUR buttons! The second is the much more efficient way to do things.
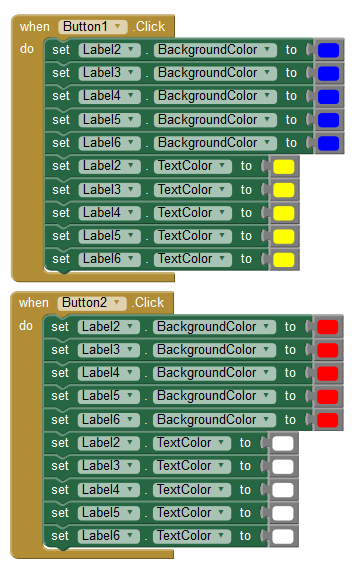
Two Buttons Changing Colors on 5 Labels
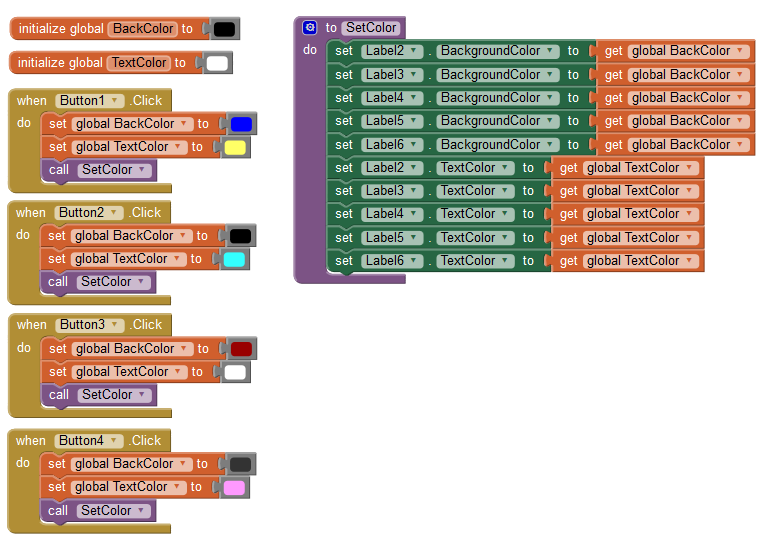
FOUR Buttons Changing the Colors of 5 Labels Using a Procedure – Much More Efficient
And, as pointed out by a viewer (thank you Taifun), you can also consolidate EVEN MORE by eliminating the two global variables, setting input parameters in the procedure, using advanced blocks and just making a single color call to the procedure. In that procedure is a for each item in list loop block. See below:
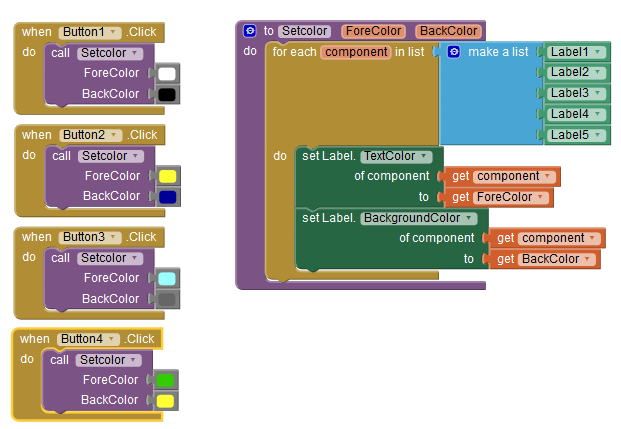
Highly consolidated, this example uses advanced blocks and input parameters for the procedure to streamline the previous example.
Backup Your Work | Shrinking AIA File Size | Redundancy | The Emulator Stinks! | Procedures | Debug with DoIt | Why Is My App Slow? | Taking Screenshots | Making an AIA File
-
MULTIPLE SCREENS – YOU REALLY DON’T NEED THAT MANY!
In any app, you really don’t need that many screens. Most screens are reusable. For example, let’s say you’re building an app that lists vacation spots. You certainly don’t need 100 screens, one for each spot. All screens would have pictures and the same groups of data, so rather than creating a separate screen for each, you create only ONE data screen. When it comes time to display the data for a specific location, just populate the same fields (components) on the screen with new data.
In addition, App Inventor lets you add Arrangements… Horizontal, Vertical, and Table. Use these on your screens to do multiple things. Arrangements can be visible or invisible. So, have several of them on your screen that do different things. For example, one arrangement can contain Login components, one can contain data components. You don’t want to show the data components until the Login is complete, but at that time, you want to show the data components, and not the Login components. So, set the data component arrangement to be invisible, and the Login arrangement to be visible. Once the user has logged in, then hide the Login arrangement by makign it invisible (you don’t need it anymore) and enabling the data arrangement by making it visible. Now, you’ve used the same screen for both the Login AND the data!
Backup Your Work | Shrinking AIA File Size | Redundancy | The Emulator Stinks! | Procedures | Multiple Screens | Why Is My App Slow? | Taking Screenshots | Making an AIA File
-
DoIt – YOUR IN-LINE DEBUGGER!
When your app is running in the emulator, you can always determine the result your block is returning. If you RIGHT-click on the top left hand corner of most blocks, you’ll get the drop down menu. Choose DoIt and the result of the expression will be shown in a small yellow bubble. For example, say you don’t understand why the text you’re putting into a label isn’t correct when displayed. You can click on the DoIt option and see what the returned result is. This can be extraordinarily important when trying to solve logic issues in your code blocks.
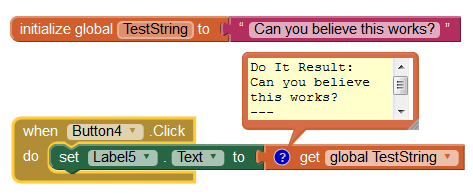
The above is the DoIt result of the variable.
Backup Your Work | Shrinking AIA File Size | Redundancy | The Emulator Stinks! | Procedures | Multiple Screens | Debug with DoIt | Taking Screenshots | Making an AIA File
-
WHY IS MY APP SLOW?
Well, this is a tougher one to answer. So many things can affect execution speed. Here are some things that can affect speed:
1. The phone/device is just busy: Your phone/device does a lot of stuff! Unlike the old analog cell phones of their day, smartphones and tablets are constantly working; their CPUs are constantly being taxed. It’s called multi-tasking or threading, but on a mobile device, the operating system handles the available memory differently than a computer would. The Android OS provides life cycles for activities, and it constantly manages what’s happening on the device. On mobile devices, only one activity can be in the forefront. When the OS needs more memory, it has the ability to kill any existing process to accommodate whatever needs the power at the time. SO, while you’d like whatever your app needs to be done immediately, the OS will do whatever’s in the queue first, then move onto the next task. If there are many tasks running concurrently in the background, they each get a share of the processing time, little by little. Just know that your app, as much as you love it, isn’t the only thing “working” on a device at any given time. Just think of all of the things that are going on… GPS is working to talk to satellites, the WiFi is working away to give you a connection. The phone is communicating with the towers, it’s retrieving email, text messages, flipping through pictures and more. Your smart device may be smart, but it’s also pretty busy!
2. Timers: Timers (clocks) are very valuable tools for programmers. However, they can certainly be used incorrectly. Considering what we learned in #1 above, timers add to the overhead of the device. The more you have, the more your device has to work. In addition to the NUMBER of timers, you must take intervals into consideration. A Timer’s tick, or when it fires, is based upon milliseconds. 1,000 milliseconds equals one second, and fires its timer event approximately at that time. Therefore, a timer with an interval of 20 will fire 50 times a second! The smaller you make the interval, the quicker it’ll fire… BUT, it’ll also use the device’s CPU that many more times per second. If you have several timers with short intervals, you’re really eating up the CPU’s time. But the CPU will need time for other things, so it’ll start to impose certain limitations, as it’ll be dividing its time up between many things. Try to limit the number of timers you use, use them wisely, and be intelligent with the intervals.
3. Redundancy: The more redundancy you have in your code, the more the CPU has to work. Please refer to the section here on Redundancy.
Backup Your Work | Shrinking AIA File Size | Redundancy | The Emulator Stinks! | Procedures | Multiple Screens | Debug with DoIt | Why Is My App Slow? | Making an AIA File
HOW TO TAKE SCREENSHOTS IN WINDOWS FOR POSTING ON THE APP INVENTOR FORUM:
If you have a problem with your code blocks, the best way to get help is to post a screenshot of your blocks with a description of the problem. That way we can see what you want to do and what you’re actually doing.
In Windows versions below Win 7, you can easily take a screenshot by holding the Shift key on your keyboard down, and hitting the PrtScn button. That copies a shot of the screen to the clipboard. Then, open Paint or some other graphics program, and paste in that image. You can then edit or crop it if necessary, and save it to your computer. Then, in your post on the forum, choose the picture button, locate the file on your computer, and select it.
In Win 7 and above, you can use the Snipping Tool, which comes with Windows. With that tool, you can take a screenshot, or a clipped region of what you want to show. Once you’ve gotten the clip into the Snipping Tool, save it and post it as described above.
Backup Your Work | Shrinking AIA File Size | Redundancy | The Emulator Stinks! | Procedures | Multiple Screens | Debug with DoIt | Why Is My App Slow? | Taking Screenshots
HOW TO MAKE AN APP INVENTOR 2 BACKUP AIA FILE:
Making an App Inventor AIA file for backup purposes is very easy and only takes a few seconds. If you don’t know WHY you need these, please go back to the top of the page and start reading again!
First, Click on Projects (#1) in the User Interface (UI). Then, from the drop down menu, choose My Projects (#2):

Step 1, Click Projects – Step 2, Choose My Projects
Once your project list loads, check the checkbox by the project you want to back up (#3).
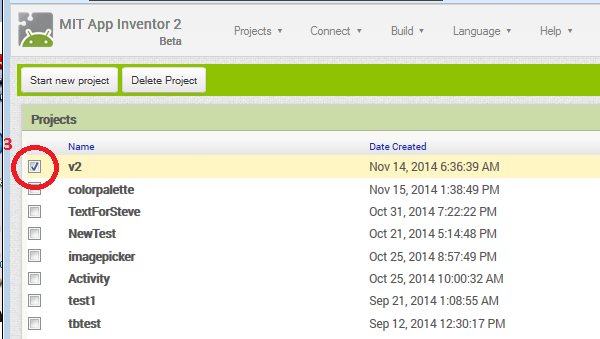
Step 3 – Choose the Project You Want to Back Up by Checking the Checkbox by That Project
Now, click on the Projects link again from the UI, and click on Export selected project (.aia) to my computer (#4):
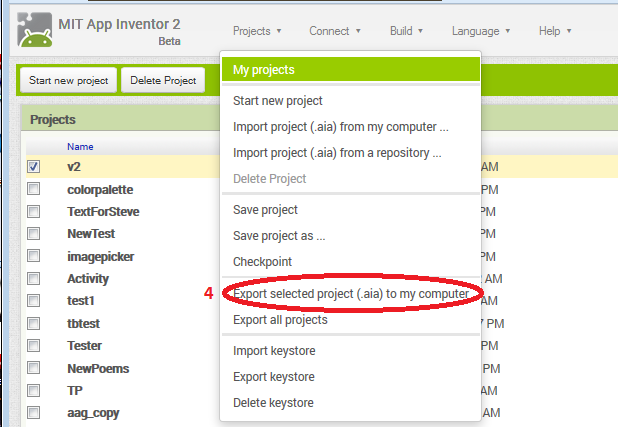
Step 4 – Click on the Projects Menu Again and choose “Export selected project (.aia) to my computer”
You’ll be presented with the following dialog box (this one is in Windows), although your file name of course will be different. Make sure Save File (#5) is selected, then click on the OK button (#6)

When the Save Dialog Appears, Step 5, Make Sure Save File is Chosen, and Step 6, Click the OK Button
That’s all there is to it. The file will be saved in your default Downloads Folder… Usually, that’s called Downloads unless you or the person who set the computer up has changed the default folder.
Note: You cannot name the AIA file before it’s saved… It’s always saved as the project name, plus the AIA extension. If your AIA file already exists, the next number will be added to the project name in parenthesis like this: v2.aia, v2(1).aia, v2(2).aia etc.
The whole process is speedy and gives you a warm blanket of backup protection. The AIA file… it’s an App Inventor 2 programmer’s best friend.